Users: Edit Viewing Access Level: Difference between revisions
From Joomla! Documentation
No edit summary |
Category |
||
| (15 intermediate revisions by 4 users not shown) | |||
| Line 13: | Line 13: | ||
</translate> | </translate> | ||
<translate><!--T:5--> | <translate><!--T:5--> | ||
* Select {{rarr|Users,Access Levels}} from the Administrator menu. Then...</translate> | |||
<translate><!--T:6--> | <translate><!--T:6--> | ||
** Select a link from the '''Level Name''' column to edit an existing level. Or...</translate> | |||
<translate><!--T:9--> | <translate><!--T:9--> | ||
** Select the New button to create a new access level.</translate> | |||
< | <translate> | ||
==Screenshot== <!--T:27--> | ==Screenshot== <!--T:27--> | ||
</translate> | </translate> | ||
[[Image:help-4x-users-user-manager-add-new-viewing-access-level-<translate> | [[Image:help-4x-users-user-manager-add-new-viewing-access-level-<translate> | ||
<!--T:28--> | <!--T:28--> | ||
en</translate>.png]] | en</translate>.png|600px]] | ||
<translate> | <translate> | ||
| Line 42: | Line 36: | ||
<!--T:31--> | <!--T:31--> | ||
*'''User Groups With Viewing Access''' Check any Group to have this Access Level.</translate> | *'''User Groups With Viewing Access''' Check any Group to have this Access Level.</translate> | ||
<translate> | |||
==User Groups With Viewing Access== <!--T:35--> | |||
</translate> | |||
<translate> | |||
<!--T:36--> | |||
Select a check box to add a user group to a viewing level. In the example shown all Groups are childs of Public so it not necessary to check any of the child groups. They inherit the Public access permissions.</translate> | |||
<translate> | |||
<!--T:37--> | |||
This feature should only be used for custom groups!</translate> | |||
<translate> | <translate> | ||
| Line 72: | Line 76: | ||
</translate> | </translate> | ||
<translate><!--T:24--> | <translate><!--T:24--> | ||
* [[ | * [[Help40:Users:_Viewing_Access_Levels/en|Users: Viewing Access Levels]]</translate> | ||
<translate><!--T:25--> | <translate><!--T:25--> | ||
* [[ | * [[Help40:Users:_Groups/en|User Manager: User: Groups]]</translate> | ||
<translate><!--T:26--> | <translate><!--T:26--> | ||
* [[ | * [[J3.x:Access_Control_List_Tutorial/en|ACL Tutorial for Joomla! 3.x]]</translate> | ||
{{Cathelp|4.0,3 | {{Cathelp|4.0,4.1,4.2,4.3|User Manager Help Screens|ACL Help Screens}} | ||
Latest revision as of 19:41, 29 March 2023
Description
Access levels control which users can view which objects on your site. Objects include menu items, modules, categories, and component items (articles, contacts, and so on). Each object in the site is assigned to one access level. User groups are also assigned to each access level.
If a user is a member of a group that in turn has permission for an access level, then that user can view all objects assigned to that access level. It is important to understand that user groups can be arranged in a parent-child hierarchy. If so, then a child group has access to all access levels that the parent group has access to. So you don't need to assign a child group access to levels that its parent group already has access to.
How to access
- Select Users → Access Levels from the Administrator menu. Then...
- Select a link from the Level Name column to edit an existing level. Or...
- Select the New button to create a new access level.
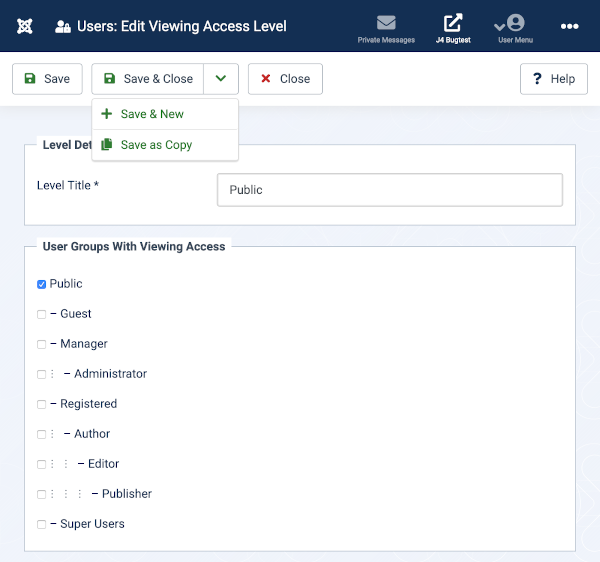
Screenshot
Level Details
- Level Title: Enter a Title for this Access level.
- User Groups With Viewing Access Check any Group to have this Access Level.
User Groups With Viewing Access
Select a check box to add a user group to a viewing level. In the example shown all Groups are childs of Public so it not necessary to check any of the child groups. They inherit the Public access permissions. This feature should only be used for custom groups!
Toolbar
At the top of the page you will see the toolbar shown in the Screenshot above. The functions are:
- Save. Saves the item and stays in the current screen.
- Save & Close. Saves the item and closes the current screen.
- Save & New. Saves the item and keeps the editing screen open and ready to create another item.
- Cancel. Closes the current screen and returns to the previous screen without saving any modifications you may have made.
- Help. Opens this help screen.
Quick tips
- If you add a new group, you may need to edit any access levels that this group should have access to.
