Users Access Levels Edit/id: Difference between revisions
From Joomla! Documentation
Created page with "Untuk membuat sebuah tingkatan akses baru," |
Updating to match new version of source page |
||
| (33 intermediate revisions by 2 users not shown) | |||
| Line 1: | Line 1: | ||
<noinclude><languages /></noinclude> | <noinclude><languages /></noinclude> | ||
{{Chunk30:Help_screen_Description_Header/en}} | |||
{{Chunk30:Help_screen_Description_This/en}} | |||
{{Chunk30:Help_screen_Description_Add/en|Access Level}} | |||
{{Chunk30:Help_screen_Description_Edit/en|Access Level}} | |||
{{Chunk30:Help_screen_How_To_Access_Header/en}} | |||
{{Chunk30:Help_screen_How_To_Access_Add/en|Access Level}} | |||
{{Chunk30:Help_screen_How_To_Access_By_Button/en|New|toolbar}}. | |||
{{Chunk30:Help_screen_How_To_Access_Edit/en|Access Level}} | |||
{{Chunk30:Help_screen_How_To_Access_By_Title/en|Access Level's|Name}} | |||
{{Chunk30:Help_screen_How_To_Access_By_Checkbox/en|Access Level's}} | |||
{{Chunk30:Help_screen_Screenshot_Header/en}} | |||
[[File:help-3x-users-user-manager-add-new-viewing-access-level-en.png|800px|border]] | |||
{{Chunk30:Help_screen_Form_Header/en}} | |||
*'''Level Title'''. Enter a Title for this Access level. | |||
{{Chunk30: | {{Chunk30:Help_screen_Toolbar_Header/en}} | ||
{{Chunk30:Help_screen_Toolbar_Position/en}} | |||
:[[File:Help32-Save-SaveClose-SaveNew-SaveAsCopy-Close-toolbar-en.png|800px|none]] | |||
{{Chunk30:Help_screen_Toolbar_Function/en}} | |||
[[ | |||
{{Chunk30:Help_screen_toolbar_icon_Save/en|access level}} | {{Chunk30:Help_screen_toolbar_icon_Save/en|access level}} | ||
{{Chunk30:Help_screen_toolbar_icon_SaveAndClose/en|access level}} | {{Chunk30:Help_screen_toolbar_icon_SaveAndClose/en|access level}} | ||
{{Chunk30:Help_screen_toolbar_icon_SaveAndNew/en|access level}} | {{Chunk30:Help_screen_toolbar_icon_SaveAndNew/en|access level}} | ||
{{Chunk30: | {{Chunk30:Help_screen_toolbar_icon_SaveAsCopy/en|access level}} | ||
{{Chunk30:Help_screen_toolbar_icon_Close/en}} | |||
{{Chunk30:Help_screen_toolbar_icon_Help/en}} | {{Chunk30:Help_screen_toolbar_icon_Help/en}} | ||
{{Chunk30:Help_screen_Quick_Tips_Header/en}} | |||
If you add a new group, you may need to edit any access levels that this group should have access to. | |||
{{Chunk30:Help_screen_Related_Information_Header/en}} | |||
* [[Help30:Users_Access_Levels|User Manager: Viewing Access Levels]] | * [[Help30:Users_Access_Levels|User Manager: Viewing Access Levels]] | ||
* [[Help30:Users_Groups|User Manager: User Groups]] | * [[Help30:Users_Groups|User Manager: User Groups]] | ||
* [[S:MyLanguage/J3.x:Access_Control_List_Tutorial|ACL Tutorial for Joomla! 3.x]] | * [[S:MyLanguage/J3.x:Access_Control_List_Tutorial|ACL Tutorial for Joomla! 3.x]] | ||
{{cathelp|3.0,3.1,3.2,3.3,3.4,3.5,3.6,3.7,3.8,3.9,3.10|User Manager Help Screens|ACL Help Screens}} | |||
Latest revision as of 07:16, 24 December 2021
Description
This is where you can
- Add a new Access Level.
- Edit an existing Access Level.
How to Access
Add a new Access Level
- Click the New button in the toolbar.
Edit an existing Access Level
- Click on an Access Level's Name.
- Check the Access Level's Checkbox
- Click the Edit button in the toolbar.
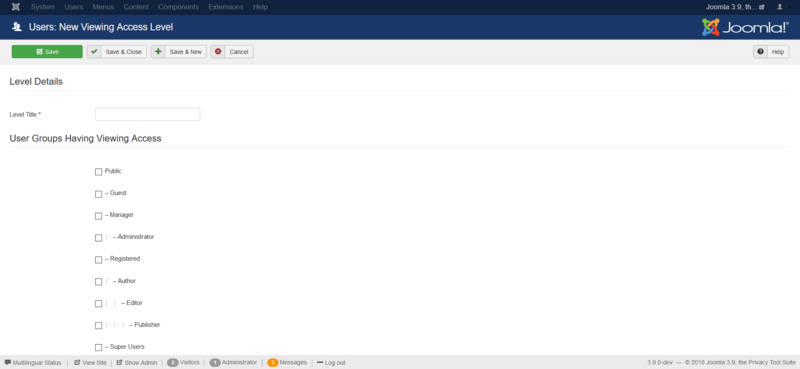
Screenshot
Form Fields
- Level Title. Enter a Title for this Access level.
Toolbar
At the top left you will see the toolbar.
The functions are:
- Save. Saves the access level and stays in the current screen.
- Save & Close. Saves the access level and closes the current screen.
- Save & New. Saves the access level and keeps the editing screen open and ready to create another access level.
- Save as Copy. Saves your changes to a copy of the current access level. Does not affect the current access level.Note: This toolbar icon is only shown if you edit an existing access level.
- Close. Closes the current screen and returns to the previous screen without saving any modifications you may have made.
- Help. Opens this help screen.
Quick Tips
If you add a new group, you may need to edit any access levels that this group should have access to.

