Users List and Details Views/hr: Difference between revisions
From Joomla! Documentation
No edit summary |
Created page with "Namjena projekta ''Enhance Users Component'' bila je da poboljša komponentu korisnika te da doda dva nova prikaza komponente. Ovaj članak će opisati ova dva nova prikaza, a..." |
||
| Line 8: | Line 8: | ||
== Uvod == | == Uvod == | ||
Namjena projekta ''Enhance Users Component'' bila je da poboljša komponentu korisnika te da doda dva nova prikaza komponente. Ovaj članak će opisati ova dva nova prikaza, a to su: | |||
*A list view based on user groups | *A list view based on user groups | ||
*A detailed view of an user | *A detailed view of an user | ||
Revision as of 14:51, 9 August 2018
Users List and Details Views
Documentation

Uvod
Namjena projekta Enhance Users Component bila je da poboljša komponentu korisnika te da doda dva nova prikaza komponente. Ovaj članak će opisati ova dva nova prikaza, a to su:
- A list view based on user groups
- A detailed view of an user
Set the access level
The access level is used to know what information is shown to the current user and also to which type of access level the current user details view is available.
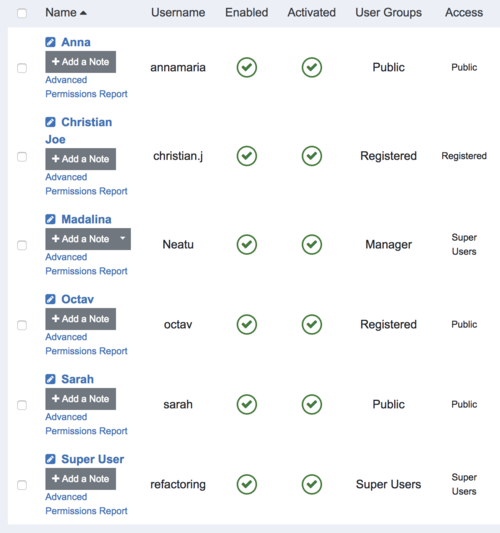
In order to set the access level for the current user, go to Users → Manage.

Here you have the Access column that can be modified in two ways:
- By editing a single user and setting the value in the Access dropdown from Account Details tab

Access level from user options - Using batch processing. You have to select the users to which you want to apply the changes, click batch and then select the value from the Set Access Level dropdown

Access level using batch processing
Note: The value of the Access column represents what the user that has that access level can see, e.g. Octav belongs to the registered users group but has public access, so he will be able to see only Anna and Sarah in the public users list and himself in the registered list.
In order to access the users list you have to create a menu item for it. Go to Menus → New Menu Item, click Select for the Menu Item Type, choose Users → User List.

Then select the users group which you want to display.

What will be displayed when you create a menu item with registered users group is:
- For an user that is not logged in, the list will contain the users that are in the registered group and have access level public, if the users have access level registered or super user, they will not be displayed.
- For an user that is logged in and has access level registered, the list will contain all users in the registered group that have access level registered or public, the ones with super user access will not be displayed.
There is also the possibility to create a menu item for a single user details view. The process is the same as for the list menu item, except that you have to choose an user instead of a group.

User List View
The information shown in the list view for each user is the name by default. Other information can be added using custom fields. The screenshot below contains the information shown in a menu item for a registered user group. The Description is a custom field.

User Details View
The information shown in the user details view includes by default the name, username and email of the user. In order to see additional information, you have use custom fields. In the picture below, the Description is a custom field.

The user details view has the option to send an email to the user that can be activated via option in the user options or global options, Form tab.

Once the Contact Form option is set to Show, the contact form is displayed in the user details view:
