Menus: Edit: Difference between revisions
From Joomla! Documentation
m Added content for Permissions tab |
Marked this version for translation |
||
| Line 13: | Line 13: | ||
*Select {{rarr|Menus,Manage}} from the Administrator menu. Then...</translate> | *Select {{rarr|Menus,Manage}} from the Administrator menu. Then...</translate> | ||
<translate> | <translate> | ||
<!--T:26--> | |||
** Select the '''New''' button in the Toolbar to create a new menu. Or...</translate> | ** Select the '''New''' button in the Toolbar to create a new menu. Or...</translate> | ||
<translate> | <translate> | ||
<!--T:27--> | |||
** Select a menu '''Title''' in the Title column to edit an existing menu.</translate> | ** Select a menu '''Title''' in the Title column to edit an existing menu.</translate> | ||
<translate> | <translate> | ||
==Screenshot==</translate> | ==Screenshot== <!--T:28--></translate> | ||
[[Image:help-4x-menus-menu-manager-add-menu-<translate> | [[Image:help-4x-menus-menu-manager-add-menu-<translate> | ||
<!--T:29--> | |||
en</translate>.png|800px|none]] | en</translate>.png|800px|none]] | ||
<translate> | <translate> | ||
==Form Fields==</translate> | ==Form Fields== <!--T:30--></translate> | ||
<translate> | <translate> | ||
<!--T:31--> | |||
* '''Title.''' The title of the menu to display in the Administrator Menubar and lists.</translate> | * '''Title.''' The title of the menu to display in the Administrator Menubar and lists.</translate> | ||
<translate> | <translate> | ||
===Menu Details Tab===</translate> | ===Menu Details Tab=== <!--T:32--></translate> | ||
<translate> | <translate> | ||
<!--T:33--> | |||
* '''Unique Name.''' The system name of the menu.</translate> | * '''Unique Name.''' The system name of the menu.</translate> | ||
<translate> | <translate> | ||
<!--T:34--> | |||
* '''Description.''' A description about the purpose of the menu.</translate> | * '''Description.''' A description about the purpose of the menu.</translate> | ||
<translate> | <translate> | ||
===Permissions Tab===</translate> | ===Permissions Tab=== <!--T:35--></translate> | ||
<translate> | <translate> | ||
<!--T:36--> | |||
You can set permissions for a menu so that only specific groups can alter the menu. The actions available are: | You can set permissions for a menu so that only specific groups can alter the menu. The actions available are: | ||
* '''Access Administration Interface''' | * '''Access Administration Interface''' | ||
Revision as of 12:29, 28 August 2020
Description
You can add or modify menus in this screen.
How to Access
- Select Menus → Manage from the Administrator menu. Then...
- Select the New button in the Toolbar to create a new menu. Or...
- Select a menu Title in the Title column to edit an existing menu.
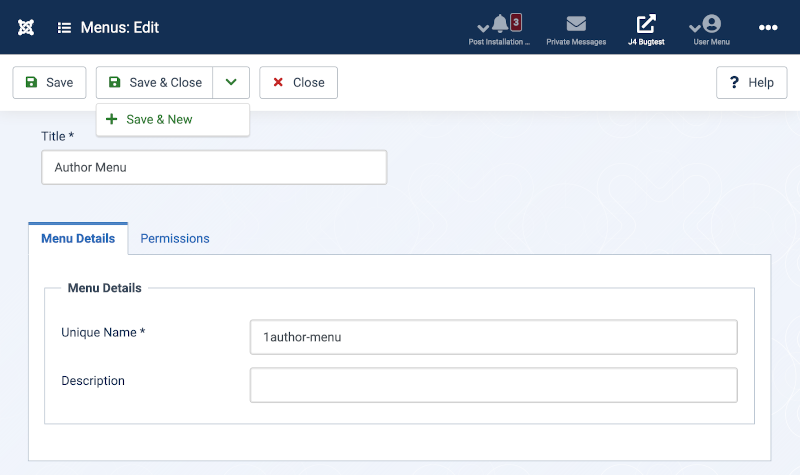
Screenshot

Form Fields
- Title. The title of the menu to display in the Administrator Menubar and lists.
Menu Details Tab
- Unique Name. The system name of the menu.
- Description. A description about the purpose of the menu.
Permissions Tab
You can set permissions for a menu so that only specific groups can alter the menu. The actions available are:
- Access Administration Interface
- Create
- Delete
- Edit
- Edit State
The available settings for each are:
- Inherited means that the permissions from global configuration, parent group and category will be used.
- Allowed means that the group being edited will be able to take this action for this item (but if this is in conflict with the global configuration, parent group or category it will have no impact; a conflict will be indicated by Not Allowed (Inherited) under Calculated Settings).
- Denied means that no matter what the global configuration, parent group or category settings are, the group being edited can't take this action on this item.
Toolbar
At the top of the page you will see the toolbar shown in the Screenshot above. The functions are:
- Save. Saves the item and stays in the current screen.
- Save & Close. Saves the item and closes the current screen.
- Save & New. Saves the item and keeps the editing screen open and ready to create another item.
- Cancel. Closes the current screen and returns to the previous screen without saving any modifications you may have made.
- Help. Opens this help screen.
Quick Tips
- Hover your mouse over the labels before the input box, and extra information will be shown.
- If you forgot to create a module for this menu, you can do so directly from the Menus screen by clicking on Add a module for this menu or by using the Module Manager, found by going to Extensions → Modules. Click on New, and then on Menu. Fill in a title and select the Menu in the Module Parameters.
- It is a good idea to give a descriptive title for new menus. This is how the menu will be identified in the Backend Menus menu. It is also a good idea to fill in the Description field with information about the menu. This is how the menu's module will be referred to in the Module Manager.
- When you create a new menu, use only alphanumeric characters without spaces in the Unique Name field. It is a good idea to use only a-z, 0-9 and underscore (_) characters. Please read the tooltips as well.