Chunk17:Toolbaricon
From Joomla! Documentation
This modular chunk can be used to display info about a standard toolbar icon in a Joomla administrator screen.
Please add the new templates you created to this page (inside the "noinclude" tags so it displays only here, not when the chunk is transcluded on an actual help page).
Help screen column headers
{{Chunk17:toolbaricon|Image}}
- Image. This button provides an easy way to insert an image into an Article. Images may be inserted from the 'images' folder and may also be uploaded. When you click the Image button in your editor or the Select button on a media field, a window pops up, as shown below:

- Directory. The current directory on the host server. This is the 'images' directory under your Joomla! home directory. Use the drop-down list box to select a subdirectory.
- Up. Navigate to the parent directory. Note that the top directory for this function is 'images'. You can not navigate to a higher directory.
- Insert. Insert the selected image. The insert point will be the current cursor position. You will see the image display inside the edit window.
- Cancel. Cancel the operation and close the popup window. You can cancel also in clicking the X at right top corner.
- Thumbnail Browse Area. Click on an image thumbnail to select the image. Click on a folder icon to navigate to that subdirectory.
- Start Upload. Once you have selected a file, press this button to upload the file to the currently selected folder. The thumbnail for the new image will now show in the thumbnail area.

{{Chunk17:toolbaricon|Page Break}}
- Page Break. This button allows you to insert a page break inside an Article. A page break allows for page navigation when the article is displayed on a layout. This is useful for long articles. When this button is pressed, a popup window is displayed as shown below:
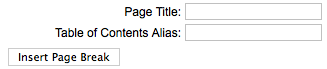
- Page Title. Enter the title to display for the new page (for example, 'Page 2').
- Table of Contents Alias. Optional field to display in the table of contents for this page. In a multi-page article, Joomla! displays a 'table of contents' for the page that allows the user to select any page. If this field is blank, the Page Title will be used. If you want a different title in the table of contents, enter it here.
- Insert Page Break. Click this button to insert the page break with the entered fields. The page break will display as a gray dashed line across the Article. Note that a page break cannot be edited. If you need to change a field in the page break, click on the Article just past the page break, press Backspace until the page break is deleted, then insert a new page break with the desired information.

{{Chunk17:toolbaricon|Read More}}
- Read more... This button inserts a 'Read more...' break in the Article. This shows as a red dotted line across the Article. If an Article has a 'Read more...' break, only the text before the break, called the Intro Text, will initially display, along with a 'Read more...' link. If the User clicks this link, either the entire Article or just the part after the 'Read more...' link is displayed. This depends on the setting of the 'Intro Text' parameters for the Article and in the Global Configuration. The 'Read more...' break allows you to save space on pages by just showing the Intro Text. Note that the 'Read more...' break only shows in the Featured and Category Blog layouts. If you want to insert breaks for an Article shown in an Article Layout, use the Page Break button.
{{Chunk17:toolbaricon|Toggle Editor}}
- Toggle Editor. This button toggles the editor between the TinyMCE editor and "No Editor", a basic code view editor.