Het hoofddoel van deze extensie is het behouden van de belangrijke boodschap die aan de afbeelding is gekoppeld, door de gebruiker een manier te bieden om het focusgebied voor de afbeelding toe te voegen. Afbeeldingen worden responsief gemaakt met behulp van deze extensie. Deze extensie wordt ondersteund door de media-actie-plug-in en de inhoud-plug-in.
Het hoofddoel van deze extensie is het behouden van de belangrijke boodschap die aan de afbeelding is gekoppeld, door de gebruiker een manier te bieden om het focusgebied voor de afbeelding toe te voegen. Afbeeldingen worden responsief gemaakt met behulp van deze extensie. Deze extensie wordt ondersteund door de media-actie-plug-in en de inhoud-plug-in.
Kenmerken
Kenmerken
* Biedt een editor de mogelijkheid voor het opnemen van de informatie van de auteur, op een meer intuïtieve manier.
* <span class="mw-translate-fuzzy">Biedt een editor de mogelijkheid voor het opnemen van de informatie van de auteur, op een meer intuïtieve manier.</span>
* Automatisch bijsnijden van de afbeeldingen volgens de viewport van het cliëntapparaat.
* <span class="mw-translate-fuzzy">Automatisch bijsnijden van de afbeeldingen volgens de viewport van het cliëntapparaat.</span>
* Het bijsnijden gebeurt rond het door de auteur geselecteerde gebied.
* <span class="mw-translate-fuzzy">Het bijsnijden gebeurt rond het door de auteur geselecteerde gebied.</span>
* Auteur kan bepaalde breedten selecteren waarvoor de afbeeldingen moeten worden bijgesneden.
* <span class="mw-translate-fuzzy">Auteur kan bepaalde breedten selecteren waarvoor de afbeeldingen moeten worden bijgesneden.</span>
* Auteur kan verschillende focus selecteren voor verschillende apparaten.
* <span class="mw-translate-fuzzy">Auteur kan verschillende focus selecteren voor verschillende apparaten.</span>
* Auteur kan ook alle aangepaste afbeeldingen en de vorige ingestelde punten voor een bepaalde afbeelding uit de editor verwijderen.
* <span class="mw-translate-fuzzy">Auteur kan ook alle aangepaste afbeeldingen en de vorige ingestelde punten voor een bepaalde afbeelding uit de editor verwijderen.</span>
* Als een auteur de originele afbeelding uit mediabeheer verwijdert, worden de aangepaste afbeelding en de focuspunten ook verwijderd.
* <span class="mw-translate-fuzzy">Als een auteur de originele afbeelding uit mediabeheer verwijdert, worden de aangepaste afbeelding en de focuspunten ook verwijderd.</span>
'' '' 'Opmerking:' '' '' Om deze extensie in te schakelen, moet de beheerder twee plug-ins inschakelen vanuit de extensiebeheerder van de plug-in:
<span class="mw-translate-fuzzy">'' '' 'Opmerking:' '' '' Om deze extensie in te schakelen, moet de beheerder twee plug-ins inschakelen vanuit de extensiebeheerder van de plug-in:</span>
# Media-Action: Smart Crop Plugin
# Media-Action: Focus Plugin
# Content: Adaptive Image Plugin
# Content: Adaptive Image Plugin
Line 25:
Line 26:
[[File:Original Image.png|center|Original image with focus area|800px]]
[[File:Original Image.png|center|Original image with focus area|800px]]
[[File:Resized Images.png|center|Resized Images for focus area mentioned]]
[[File:Resized Images.png|center|Resized Images for focus area mentioned]]
== Hoe focuspunten instellen voor een bepaalde afbeelding? ==
== Hoe focuspunten instellen voor een bepaalde afbeelding? ==
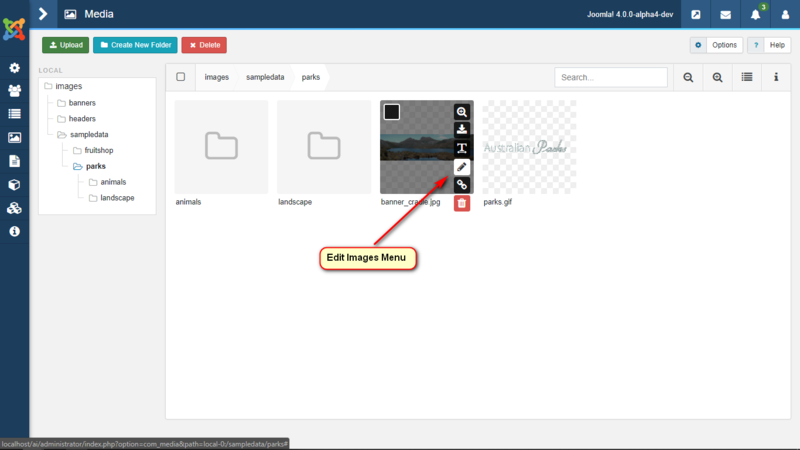
# Ga naar Media Manager, zoek de afbeelding waaraan u focuspunten wilt toevoegen.{{-}}[[File: NMM edit images-en.png|center|800px]]
# Ga naar Media Manager, zoek de afbeelding waaraan u focuspunten wilt toevoegen.{{-}}[[File: NMM edit images-en.png|center|800px]]
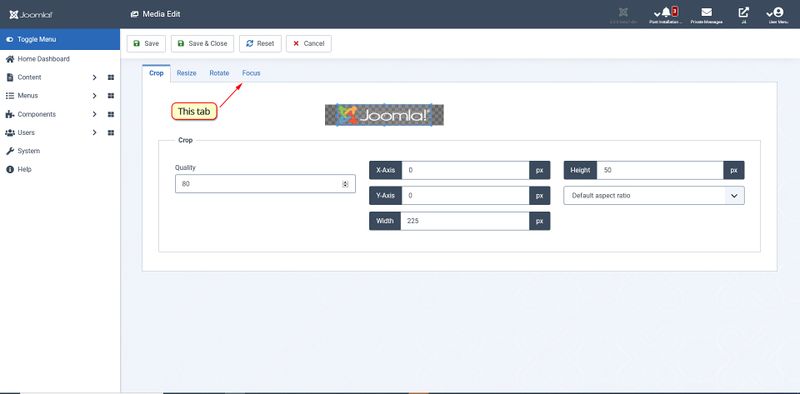
# Bewerk die afbeelding, u wordt omgeleid naar het nieuwe venster, ga naar het tabblad Smart Crop.{{-}}[[File:Edit image-en.png|center|800px]]
# <span class="mw-translate-fuzzy">Bewerk die afbeelding, u wordt omgeleid naar het nieuwe venster, ga naar het tabblad Smart Crop.</span>{{-}}[[File:Edit image-en.png|center|800px]]
# Selecteer nu het focusgebied van de afbeelding, met behulp van de meegeleverde editor.{{-}}[[File: Smart Crop Tab-en.png | center|800px]]
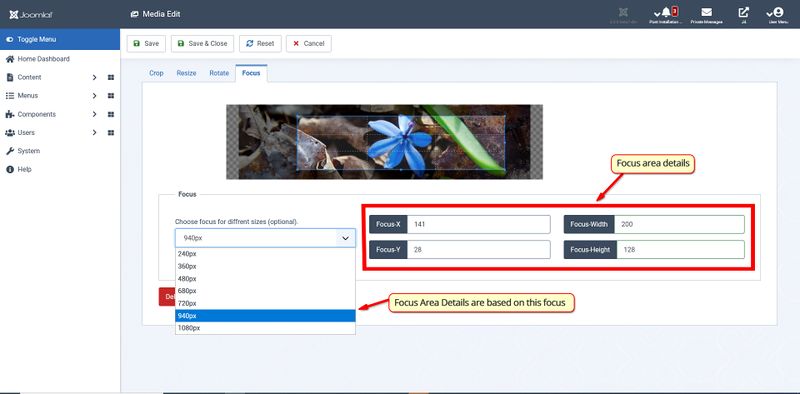
# Selecteer nu het focusgebied van de afbeelding, met behulp van de meegeleverde editor.{{-}}[[File: Focus Tab-en.png | center|800px]]
# Na het instellen van het gebied, Opslaan en sluiten van de editor, wordt u teruggeleid naar de media manager.{{-}}[[File:Parameters-en.png|center|800px]]
# Na het instellen van het gebied, Opslaan en sluiten van de editor, wordt u teruggeleid naar de media manager.{{-}}[[File:Parameters-en.png|center|800px]]
# Voeg die afbeelding nu gewoon toe aan uw artikel. '' Bash ... !! Je afbeelding reageerde responsief met behoud van het belangrijke gedeelte van die afbeelding. ''
# <span class="mw-translate-fuzzy">Voeg die afbeelding nu gewoon toe aan uw artikel. '' Bash ... !! Je afbeelding reageerde responsief met behoud van het belangrijke gedeelte van die afbeelding. ''</span>
== Meervoudige focus toevoegen ==
== Meervoudige focus toevoegen ==
Line 37:
Line 40:
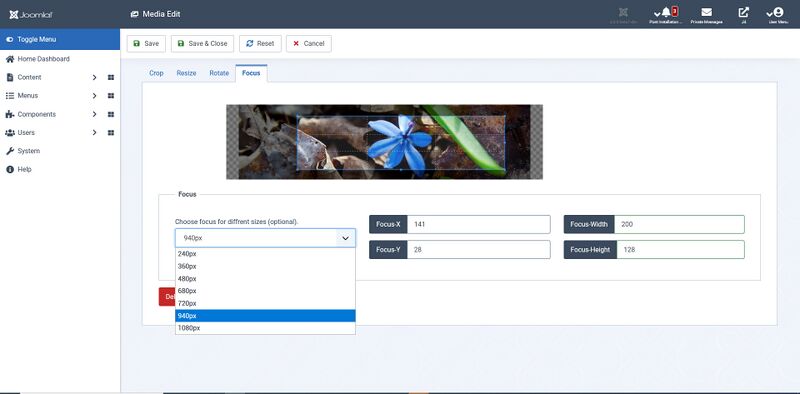
# Nu vindt u in de rechterbovenhoek van de plug-in een vervolgkeuzemenu met verschillende genoemde breedten.{{-}}[[File:Different Focus-en.png|center|800px]]
# Nu vindt u in de rechterbovenhoek van de plug-in een vervolgkeuzemenu met verschillende genoemde breedten.{{-}}[[File:Different Focus-en.png|center|800px]]
# Selecteer een breedte en selecteer vervolgens het focuspunt in de focuseditor.
# Selecteer een breedte en selecteer vervolgens het focuspunt in de focuseditor.
# Save and close the tab.
# Opslaan en sluit het tabblad.
==Adding custom widths==
==Adding custom widths==
# Go to plugin's extension manager, look for '''Media-Action Smart Crop'''.{{-}} [[File:Plugin extension manager-en.png|center|800px]]
# <span class="mw-translate-fuzzy">Ga naar plug-in-extensiemanager, zoek naar '''Media-Action Smart Crop'''</span>{{-}} [[File:Plugin extension manager-en.png|center|800px]]
# Now add new widths over here, and save the plugin.{{-}}[[File:Add Widths-en.png|center|800px]]{{-}}[[File:Enter Widths-en.png|center|800px]]
# Now add new widths over here, and save the plugin.{{-}}[[File:Add Widths-en.png|center|800px]]{{-}}[[File:Enter Widths-en.png|center|800px]]
# You would be noticing those widths in the '''Smart Crop''' tab.{{-}}[[File: Custom widths-en.png|center|800px]]
# You would be noticing those widths in the '''Focus''' tab.{{-}}[[File: Custom widths-en.png|center|800px]]
==Deleting the previous set focus point==
==Deleting the previous set focus point==
'''Note: ''' This will delete all the previously saved focus and resized images of the original image generated by the plugin.
'''Note: ''' This will delete all the previously saved focus and resized images of the original image generated by the plugin.
# Go to the '''Smart Crop tab''' in the '''Edit Image'''.
# Go to the '''Focus tab''' in the '''Edit Image'''.
# In the lower right of the screen there is a delete focus button.
# In the lower right of the screen there is a delete focus button.
# After deleting the previous focus reload the page or hit cancel to go back to media-manager
# After deleting the previous focus reload the page or hit cancel to go back to media-manager
[[File:Delete Focus Button-en.png|center|800px]]
[[File:Delete Focus Button-en.png|center|800px]]
==Workflow==
==Workflow==
This Extension consists of two independent plugins.
This Extension consists of two independent plugins.
===Smart Crop Plugin===
===Focus Plugin===
This is a Media-Action plugin. It is providing the UI for managing the focus points. It takes in the focus points from the user and saves it into the file storage by sending an AJAX request to the controller <tt>AdaptiveImageController.php</tt>. Finally, when the author is satisfied with the focus he hit '''Save and Close''' which raises another AJAX request, this time new images are generated with an efficient algorithm and save them into the directory <tt>/media/focus</tt>. Nomenclature of resized images is <tt>(resize image width)_(base64 encoded full path of the image).</tt>
This is a Media-Action plugin. It is providing the UI for managing the focus points. It takes in the focus points from the user and saves it into the file storage by sending an AJAX request to the controller <tt>AdaptiveImageController.php</tt>. Finally, when the author is satisfied with the focus he hit '''Save and Close''' which raises another AJAX request, this time new images are generated with an efficient algorithm and save them into the directory <tt>/media/focus</tt>. Nomenclature of resized images is <tt>(resize image width)_(base64 encoded full path of the image).</tt>
GSoC 2018
Adaptief beeld voor nieuwe Media Manager Documentatie
Joomla!
4.x
Introductie
Het hoofddoel van deze extensie is het behouden van de belangrijke boodschap die aan de afbeelding is gekoppeld, door de gebruiker een manier te bieden om het focusgebied voor de afbeelding toe te voegen. Afbeeldingen worden responsief gemaakt met behulp van deze extensie. Deze extensie wordt ondersteund door de media-actie-plug-in en de inhoud-plug-in.
Kenmerken
Biedt een editor de mogelijkheid voor het opnemen van de informatie van de auteur, op een meer intuïtieve manier.
Automatisch bijsnijden van de afbeeldingen volgens de viewport van het cliëntapparaat.
Het bijsnijden gebeurt rond het door de auteur geselecteerde gebied.
Auteur kan bepaalde breedten selecteren waarvoor de afbeeldingen moeten worden bijgesneden.
Auteur kan verschillende focus selecteren voor verschillende apparaten.
Auteur kan ook alle aangepaste afbeeldingen en de vorige ingestelde punten voor een bepaalde afbeelding uit de editor verwijderen.
Als een auteur de originele afbeelding uit mediabeheer verwijdert, worden de aangepaste afbeelding en de focuspunten ook verwijderd.
'Opmerking:' Om deze extensie in te schakelen, moet de beheerder twee plug-ins inschakelen vanuit de extensiebeheerder van de plug-in:
Original image with focus areaResized Images for focus area mentioned
Hoe focuspunten instellen voor een bepaalde afbeelding?
Ga naar Media Manager, zoek de afbeelding waaraan u focuspunten wilt toevoegen.
Bewerk die afbeelding, u wordt omgeleid naar het nieuwe venster, ga naar het tabblad Smart Crop.
Selecteer nu het focusgebied van de afbeelding, met behulp van de meegeleverde editor.File:Focus Tab-en.png
Na het instellen van het gebied, Opslaan en sluiten van de editor, wordt u teruggeleid naar de media manager.
Voeg die afbeelding nu gewoon toe aan uw artikel. Bash ... !! Je afbeelding reageerde responsief met behoud van het belangrijke gedeelte van die afbeelding.
Meervoudige focus toevoegen
Volg de basisstap om de eerste focuspunten in te stellen.
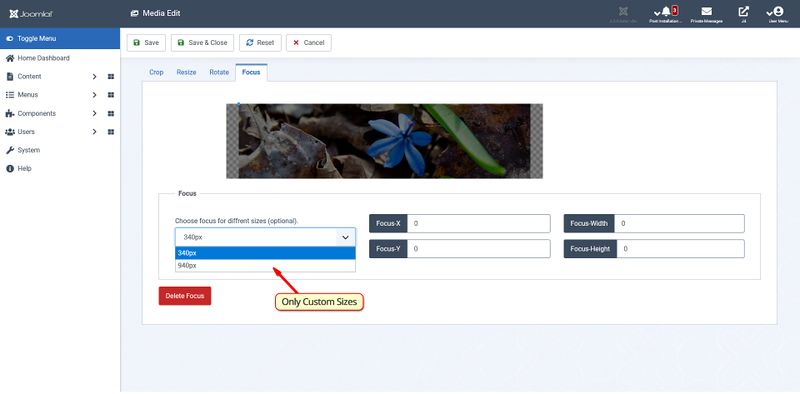
Nu vindt u in de rechterbovenhoek van de plug-in een vervolgkeuzemenu met verschillende genoemde breedten.
Selecteer een breedte en selecteer vervolgens het focuspunt in de focuseditor.
Opslaan en sluit het tabblad.
Adding custom widths
Ga naar plug-in-extensiemanager, zoek naar Media-Action Smart Crop
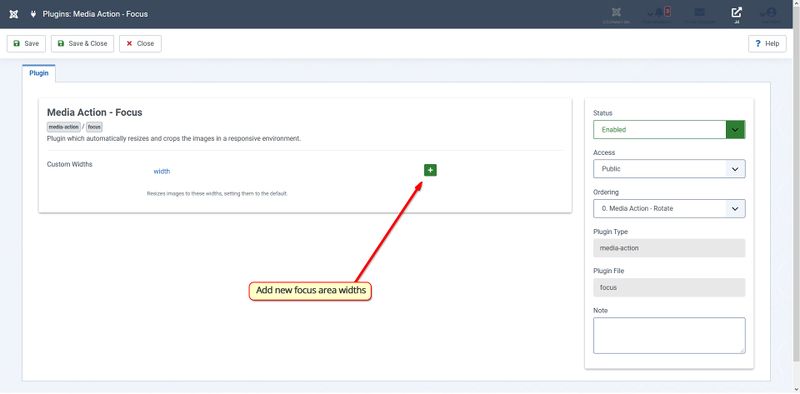
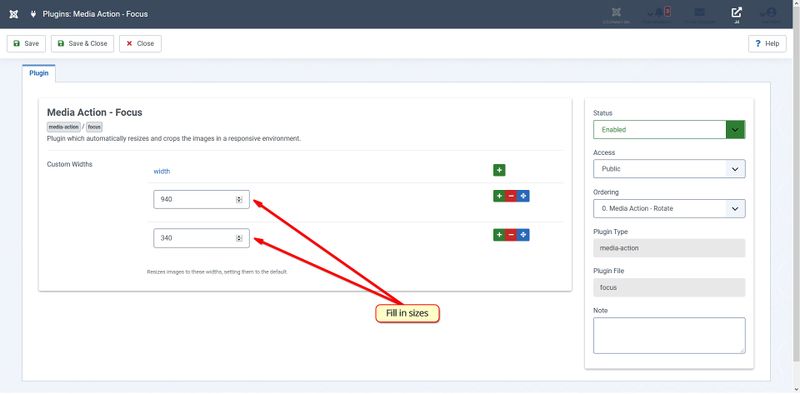
Now add new widths over here, and save the plugin.
You would be noticing those widths in the Focus tab.
Deleting the previous set focus point
Note: This will delete all the previously saved focus and resized images of the original image generated by the plugin.
Go to the Focus tab in the Edit Image.
In the lower right of the screen there is a delete focus button.
After deleting the previous focus reload the page or hit cancel to go back to media-manager
Workflow
This Extension consists of two independent plugins.
Focus Plugin
This is a Media-Action plugin. It is providing the UI for managing the focus points. It takes in the focus points from the user and saves it into the file storage by sending an AJAX request to the controller AdaptiveImageController.php. Finally, when the author is satisfied with the focus he hit Save and Close which raises another AJAX request, this time new images are generated with an efficient algorithm and save them into the directory /media/focus. Nomenclature of resized images is (resize image width)_(base64 encoded full path of the image).
Adaptive Image Plugin
This is a Content plugin. If the focus of a particular image is being set in the currently opened article then this plugin will add the <picture> element to that image and all the associated resized-images will be appended to it from /media/focus/. This plugin will also delete all the resized images if the original image is not found (or deleted).
Extending Extension
Changing storage for focus points
Currently, The focus area is being saved in JSON format in the file storage(JSONFocusStore Driver). This can be changed to any other storage by making a new driver class into Joomla\CMS\AdaptiveImage\.The driver class should implement Joomla\CMS\AdaptiveImage\FocusStoreInterface interface.
JSONFocusStore driver class is implementing Joomla\CMS\AdaptiveImage\FocusStoreInterface. FocusStoreInterface has following methods declared:
1. setFocus($dataFocus, $width, $imgSrc)
This method stores/updates the focus area into the storage.
$dataFocus It has the dimensions of the focus area. It is an array with keys box-left, box-top, box-width, box-height.
$width It is the size of image for which the focus area is being stored.
$imgSrc It is the full path of the image corresponding to the focus area.
2. getFocus($imgSrc, $width)
This method returns the focus area of the image. It return all the focus area associated with the image
$imgSrc It is the full path of the image corresponding to the focus area.
$width(optional) If the user want to take in the value of focus area for particular width then, it may be mentioned.
3. deleteFocus($imgSrc)
It deletes all the focus associated with the image.
$imgSrc It is the full path of the image corresponding to the focus area.