Extensions Module Manager Edit: Difference between revisions
From Joomla! Documentation
new page, fixing broken help screen link in 3.0 administration view |
m creating new page with subst of Help25, will remove 25 and make 30 next |
||
| Line 1: | Line 1: | ||
{{RightTOC}} | {{RightTOC}} | ||
==How to Access== | ==How to Access== | ||
Go to the Module Manager by: | |||
* Clicking on the Module Manager icon in the Control Panel | |||
* Top drop down menu, {{rarr|Extensions,Module Manager}} | |||
After that, click on the ''''New'''' button in the toolbar to [[Help25:Extensions Module Manager Edit#Create New|create a new Module Item]], or select a Module by double clicking the Module's '''Title''' or check the 'check box' and click on the 'Edit' button. | |||
==Description== | ==Description== | ||
The Extensions Module Manager Edit (New) allows editing an existing Module or creating a new Module by Module type. | |||
==Screenshot== | ==Screenshot== | ||
[[ | Module 'Edit' or create 'New' Module screens are dependent on Module Type. For the right column 'Basic' or 'Advanced' Options, please see: | ||
: A '''[[#Related Information|Specific Module Type]]''' Help screen, links with descriptions are listed below. | |||
[[Image:Help25-extensions-module-manager-edit.png]] | |||
==Details== | |||
The screenshot above shows the editing view of a 'Archived Article' Module. For '''[[#Related Information|Specific Module Type]]''' Help screen, links with descriptions are listed below. | |||
===Details of Module=== | |||
{{colheader|Enter Title}} | |||
{{Chunk25:colheader|Show Title Module}} | |||
{{Chunk25:colheader|Enter Category}} | |||
{{Chunk25:colheader|Postion}} | |||
{{Chunk25:colheader|Enter Status}} | |||
{{Chunk25:colheader|Enter Access}} | |||
{{Chunk25:colheader|Ordering}} | |||
{{Chunk25:colheader|Start Publishing}} | |||
{{Chunk25:colheader|Finish Publishing}} | |||
{{Chunk25:colheader|Enter Language}} | |||
{{Chunk25:colheader|Note}} | |||
{{Chunk25:colheader|Id}} | |||
{{Chunk25:colheader|Module Description}} | |||
===Menu assignment=== | ===Menu assignment=== | ||
:[[File:Help25-Module-Manager-Edit-menu-assignment.png]] | |||
This section contains all the menu items configured in your Joomla! website. To apply the current style to a menu item's corresponding web page, check the box next to the menu item. You can press the ''Toggle Selection'' button to invert the menu item selections. | This section contains all the menu items configured in your Joomla! website. To apply the current style to a menu item's corresponding web page, check the box next to the menu item. You can press the ''Toggle Selection'' button to invert the menu item selections. | ||
'''Note''': If a checkbox is grayed out and cannot be checked then it could be because the menu item is in use by another user. You can see if this is the case by going to the [[Help25:Menus Menu Item Manager|menu manager screen for the menu]] concerned. If there is a padlock symbol next to the menu item then it is currently in use by another user. | '''Note''': If a checkbox is grayed out and cannot be checked then it could be because the menu item is in use by another user. You can see if this is the case by going to the [[Help25:Menus Menu Item Manager|menu manager screen for the menu]] concerned. If there is a padlock symbol next to the menu item then it is currently in use by another user. | ||
=== | ===Additional Options=== | ||
Additional Options, such as '''Basic''' and '''Advanced''' can be found on the [[#Related Information|specific Module Type]] Help screen. Please note, installed Extensions may contain more parameters in Additional Options. Please refer to the specific Extension Module's information provided by the Extension developer. | |||
===Create New=== | |||
When creating a new Module, you will be presented with a modal pop up window. Choose the module type by clicking on the module name to be taken to the 'edit' details screen. | |||
[[File:Help25-Extensions-Module-Manager-create-new-popup.png]] | |||
==Toolbar== | ==Toolbar== | ||
===Edit Module=== | |||
For existing Modules, edit functions: | |||
{{Chunk25:Help_screen_module_manager_edit_toolbar}} | |||
===New Module=== | |||
For creating a New Module, new functions: | |||
{{Chunk25:Help_screen_module_manager_new_toolbar}} | |||
==Related Information== | |||
{{relatedhelp|Extensions Module Manager|not=admin}} | |||
<noinclude>{{cathelp|3.0|Template Manager Help Screens|Styles Help Screens}}</noinclude> | <noinclude>{{cathelp|3.0|Template Manager Help Screens|Styles Help Screens}}</noinclude> | ||
Revision as of 14:03, 15 February 2013
How to Access
Go to the Module Manager by:
- Clicking on the Module Manager icon in the Control Panel
- Top drop down menu, Extensions → Module Manager
After that, click on the 'New' button in the toolbar to create a new Module Item, or select a Module by double clicking the Module's Title or check the 'check box' and click on the 'Edit' button.
Description
The Extensions Module Manager Edit (New) allows editing an existing Module or creating a new Module by Module type.
Screenshot
Module 'Edit' or create 'New' Module screens are dependent on Module Type. For the right column 'Basic' or 'Advanced' Options, please see:
- A Specific Module Type Help screen, links with descriptions are listed below.

Details
The screenshot above shows the editing view of a 'Archived Article' Module. For Specific Module Type Help screen, links with descriptions are listed below.
Details of Module
- Title. The Title for this item. This may or may not display on the page, depending on the parameter values you choose.
- Show Title. (Use Show or Hide). Whether or not to show the Module's Title.
- Category. Select the Category for this Article from the drop-down list box.
- Position. Click button to open a modal pop up window to select Module position by available positions in a Template(s) installed.
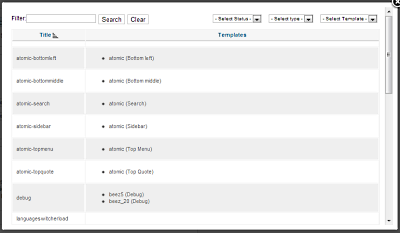
- Filter. Filter positions by title of position.
- Select Status. Filter positions by status, enabled or disabled.
- Type. Filter positions by type, User(User created) or Template.
- Template. Filter positions by title of template installed.
- Click to sort. Click column heading, Title or Templates to sort by the column.

- Status. The published status of this item.
- Published: Item is visible in the front end of the site.
- Unpublished: Item is will not be visible to guests in the front end of the site. It may be visible to logged in users who have edit state permission for the item.
- Archived: Item will no longer show on blog or list menu items.
- Trashed: Item is deleted from the site but still in the database. It can be permanently deleted from the database with the Empty Trash function in Article Manager.
- Access. Select the viewing access level for this item from the list box. The access levels that display will depend on the what has been set up for this site in Users→Access Levels. Note that access levels are separate from ACL permissions. Access levels control what a user can see. ACL permissions control what actions a user can perform.
- Ordering. Select the ordering of the module as compared to other modules in the same position. See Position.
- Start Publishing. Date and time to start publishing. Use this field if you want to enter content ahead of time and then have it published automatically at a future time.
- Finish Publishing. Date and time to finish publishing. Use this field if you want to have content automatically changed to Unpublished state at a future time (for example, when it is no longer applicable).
- Language. Select the language for this item. If you are not using the multi-language feature of Joomla, keep the default of 'All'.
- Note. Item note. This is normally for the site administrator's use (for example, to document information about this item) and does not show in the front end of the site.
- ID. This is a unique identification number for this item assigned automatically by Joomla!. It is used to identify the item internally, and you cannot change this number. When creating a new item, this field displays 0 until you save the new entry, at which point a new ID is assigned to it.
- Module Description. A summary of the the Module type with a description.
Menu assignment

This section contains all the menu items configured in your Joomla! website. To apply the current style to a menu item's corresponding web page, check the box next to the menu item. You can press the Toggle Selection button to invert the menu item selections.
Note: If a checkbox is grayed out and cannot be checked then it could be because the menu item is in use by another user. You can see if this is the case by going to the menu manager screen for the menu concerned. If there is a padlock symbol next to the menu item then it is currently in use by another user.
Additional Options
Additional Options, such as Basic and Advanced can be found on the specific Module Type Help screen. Please note, installed Extensions may contain more parameters in Additional Options. Please refer to the specific Extension Module's information provided by the Extension developer.
Create New
When creating a new Module, you will be presented with a modal pop up window. Choose the module type by clicking on the module name to be taken to the 'edit' details screen.

Toolbar
Edit Module
For existing Modules, edit functions: At the top right you will see the toolbar:

The functions are:
- Save. Saves the module and stays in the current screen.
- Save & Close. Saves the module and closes the current screen.
- Save & New. Saves the module and keeps the editing screen open and ready to create another module.
- Save as Copy. Saves your changes to a copy of the current module. Does not affect the current module. This toolbar icon is not shown if you are creating a new module.
- Cancel/Close. Closes the current screen and returns to the previous screen without saving any modifications you may have made.
- Help. Opens this help screen.
New Module
For creating a New Module, new functions: At the top right you will see the toolbar:

The functions are:
- Save. Saves the module and stays in the current screen.
- Save & Close. Saves the module and closes the current screen.
- Save & New. Saves the module and keeps the editing screen open and ready to create another module.
- Cancel/Close. Closes the current screen and returns to the previous screen without saving any modifications you may have made.
- Help. Opens this help screen.