Fields: Edit: Difference between revisions
From Joomla! Documentation
mNo edit summary |
Marked this version for translation |
||
| Line 85: | Line 85: | ||
</translate> | </translate> | ||
:[[File:Help-4x-Content-Article-Manager-Field-publishing-publisching-subscreen-<translate><!--T:100--> en</translate>.png|600px]] | :[[File:Help-4x-Content-Article-Manager-Field-publishing-publisching-subscreen-<translate><!--T:100--> en</translate>.png|600px]] | ||
*<translate>'''Created Date'''.</translate> <translate> The current time when the field was created. Enter in a different date and time or click on the calendar icon to find the desired date.</translate> | *<translate><!--T:304--> '''Created Date'''.</translate> <translate> <!--T:305--> The current time when the field was created. Enter in a different date and time or click on the calendar icon to find the desired date.</translate> | ||
*<translate>'''Created By'''.</translate> <translate>Name of the User who created this field. This will default to the currently logged-in user. If you want to change this to a different user, click the Select User button.</translate> | *<translate><!--T:306--> '''Created By'''.</translate> <translate><!--T:307--> Name of the User who created this field. This will default to the currently logged-in user. If you want to change this to a different user, click the Select User button.</translate> | ||
*<translate>'''Modified Date'''.</translate> <translate>Date of last modification.</translate> | *<translate><!--T:308--> '''Modified Date'''.</translate> <translate><!--T:309--> Date of last modification.</translate> | ||
*<translate>'''Modified By'''.</translate> <translate>Username who performed the last modification.</translate> | *<translate><!--T:310--> '''Modified By'''.</translate> <translate><!--T:311--> Username who performed the last modification.</translate> | ||
*<translate>'''ID'''.</translate> <translate>A unique identification number for this field, you cannot change this number. When creating a new field, this field displays <tvar name=1>"0"</tvar> until you save the new entry.</translate> | *<translate><!--T:312--> '''ID'''.</translate> <translate><!--T:313--> A unique identification number for this field, you cannot change this number. When creating a new field, this field displays <tvar name=1>"0"</tvar> until you save the new entry.</translate> | ||
<translate> | <translate> | ||
Revision as of 08:57, 19 August 2022
Description
This screen is used to add a new or edit a existing Field in Articles, Contacts, and Users.
How to Access
To add a Field:
- Content → Fields
- select from the dropdown list:
- Articles
- Category
- click the New toolbar button
- select from the dropdown list:
- Components → Contacts → Fields
- select from the dropdown list:
- Contact
- Category
- click the New toolbar button
- select from the dropdown list:
- Users → Fields
- click the New toolbar button
To edit a Field:
- Select a Title from the list
Screenshot
Form Fields
- Title. The Title for this field.
General
Parameters for all Custom Fields:
- Type. If you create a field you can choose one of the 16 field types. When you save the field this type is permanent. Learn more.
- Name. The name will be used to identify the field. Leave this blank and Joomla will fill in a default value from the title.
- Label. Use a descriptive text of the field for the label of the field. This text is not translatable. If you do not enter any text for a label the title text will also used as label text.
- Description. The description of the field. A text that will be shown as a tool tip when the user moves the mouse over the text box while he use it in the Backend creating an article or a contact or a third party component that supports custom fields. This text is not translatable. You do not see this description in the Frontend.
- Required. Is this a mandatory custom field? In this case the field has to be filled before submitting an article or a contact or a third party component that supports custom fields.
- Status. The published status of this field.
- Published: The field is visible while editing an article or an contact. And it is visible in the Frontend.
- Unpublished: The field is will not be visible to users while editing an article or an contact.
- Archived: The field will no longer show on edition an article or an contact. You can open it in the field manager when you set the filter to archived.
- Trashed: The field is deleted but still in the database. It can be permanently deleted from the database with the Empty Trash function in Field Manager. Learn more.
- Field Group. You can assign a custom field to one or more field groups.
- Category. You can assign a custom field to one or more field categories. Note that the default 'All' does not include 'uncategorised' articles.
- Access. Select the viewing access level for this field. The access levels depend on what has been set up in Users: Access Levels.
- Language. Select the language for this custom field. If you are not using the multi-language feature of Joomla, keep the default of 'All'.
- Note. An optional field to make your personal notes for the field.
Options
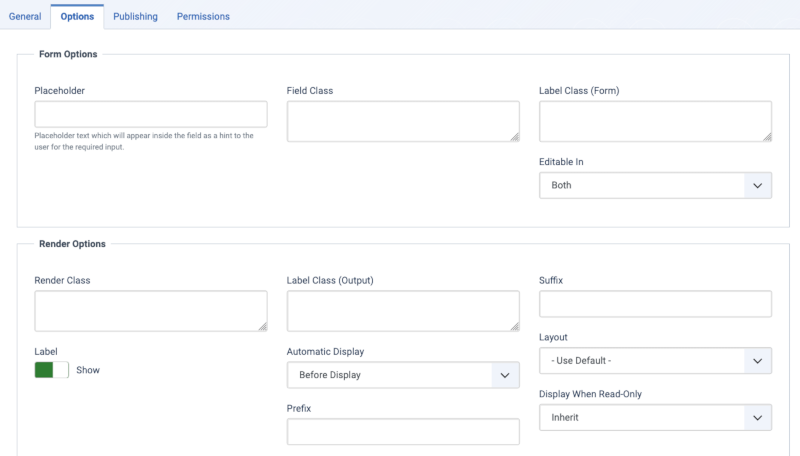
Form Options
- Placeholder. A placeholder text which will appear inside the custom field as a hint for the input. The placeholder is active in the Backend while creating an article or a contact or a third party component that supports custom fields. You do do not see it in the Frontend.
- Field Class. The class attributes of the field when the field is rendered. If different classes are needed, list them with spaces.
- Label Class (Form).
- Editable In. On which part of the site should the field be shown. In the Backend, in the Frontend or both?
Display Options
- Display Class. The class of the field container in the output.
- Value Class. The class of the field value in the output.
- Label. Show the label when the field renders.
- Label Class (Output).
- Automatic Display. Joomla offers some content events which are triggered during the content creation process. This is the place to define how the custom fields should be integrated into content. You can choose
- After Title
- Before Display Content
- After Display Content
- Do not automatically display
- Prefix.
- Suffix.
- Layout.
- Display When Read-Only.
Publishing
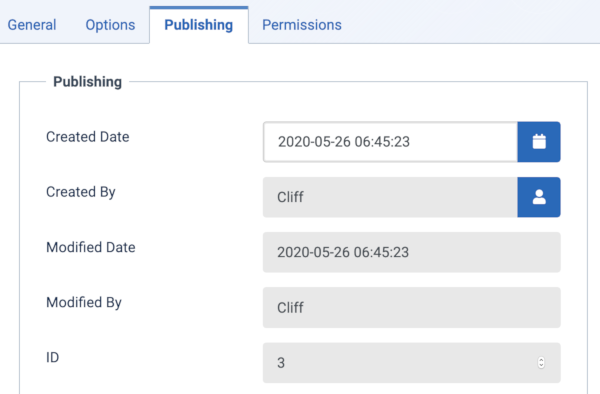
- Created Date. The current time when the field was created. Enter in a different date and time or click on the calendar icon to find the desired date.
- Created By. Name of the User who created this field. This will default to the currently logged-in user. If you want to change this to a different user, click the Select User button.
- Modified Date. Date of last modification.
- Modified By. Username who performed the last modification.
- ID. A unique identification number for this field, you cannot change this number. When creating a new field, this field displays "0" until you save the new entry.
Permissions
Joomla lets you set permissions for fields at four levels, as follows.
- Globally, using Global Configuration.
- For all articles, using Article Manager→Options.
- For all articles in a category, using Category.
- For an individual article, using Article Edit.
This is where you can enter permissions for this one field. The screen shows as follows.
To change the permissions for this field, do the following.
- Select the Group by clicking its title.
- Find the desired Action. Possible Actions are:
- Delete. Users can delete this field.
- Edit. Users can edit this field.
- Edit State. User can change the published state and related information for this field.
- Edit Custom Field Value. Users can edit the Custom field value.
- Select the desired permission for the action you wish to change. Possible settings are:
- Inherited. Inherited for users in this Group from the Global Configuration, Article Manager Options, or Category permissions.
- Allowed. Allowed for users in this Group. Note that, if this action is Denied at one of the higher levels, the Allowed permission here will not take effect. A Denied setting cannot be overridden.
- Denied. Denied for users in this Group.
- Click Save. When the screen refreshes, the Calculated Setting column will show the effective permission for this Group and Action.
Toolbar
At the top of the page you will see the toolbar shown in the Screenshot above. The functions are:
- Save. Saves the item and stays in the current screen.
- Save & Close. Saves the item and closes the current screen.
- Save & New. Saves the item and keeps the editing screen open and ready to create another item.
- Cancel. Closes the current screen and returns to the previous screen without saving any modifications you may have made. Or...
- Close. Closes the current screen and returns to the previous screen without saving any modifications you may have made. This toolbar icon is not shown if you are creating a new item.
- Help. Opens this help screen.
Quick Tips
If you want to know how to use Custom Fields, click Managing Custom Fields
Related Information
- To edit Articles
- To manage Featured Articles
- To manage Categories


