Help4.x:Site Modules: Smart Search
From Joomla! Documentation
This help4.x page is actively undergoing a major edit for 2020-06-06.
As a courtesy, please do not edit this page while this message is displayed. The user who added this notice will be listed in the page history. This message is intended to help reduce edit conflicts; please remove it between editing sessions to allow others to edit the page.
If this page has not been edited within the given timeframe or date, please remove this template, or replace it with {{underconstruction}} or {{incomplete}}.
Description
Smart Search is an enhanced site search.
How to Access
Chunk4x:ModuleManager-How-to-acces-module
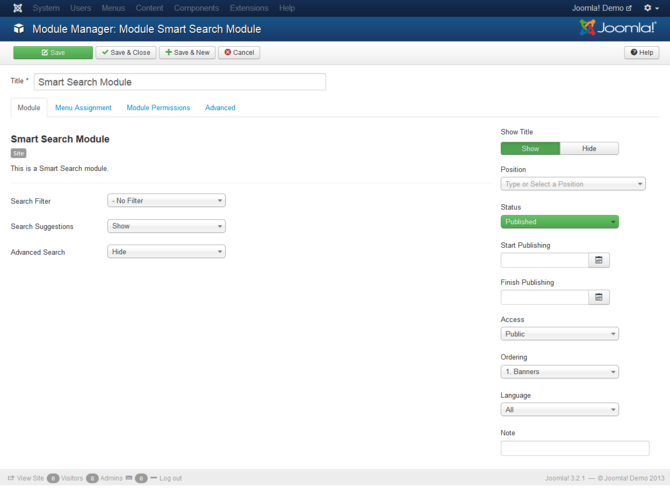
Screenshot

Details
- Title: Module must have a title
Module
This is a Smart Search module.
- Search Filter: (No Filter). Selecting a Search Filter will limit any searches submitted through this module to use the selected filter.
- Search Suggestions: (Show/Hide). Toggle whether automatic search suggestions should be displayed.
- Advanced Search: (Link to Component/Show/Hide). Toggle whether users should be able to see advanced search options. If set to Link to Component option creates an Smart Search link which redirects to the smart search view. If set to show, the advanced search options will be displayed inline.
Common Details
Help30-module-manager-details-screenshot.png
- Title. The title of the module. This is also the title displayed for the module depending on the Show Title Form Field
- Show Title. (Show/Hide) Choose whether to show or hide the modules title in the front end. The title will be the one in the Form Field above.
- Position. Choose the module position you wish this module to be displayed in. A custom module position can be entered for use with the load position plugin or the position button can be pressed to select a module position from the template.
- Status. The published status of the item.
- Access. The viewing Access Level for this item.
- Module Ordering. This shows a drop down of every module in the position that the current module is in. This is the order that the modules will display in when displayed on in the front end as well as in the Modules page.
- Start Publishing. Date and time to start publishing. Use this field if you want to enter content ahead of time and then have it published automatically at a future time.
- Finish Publishing. Date and time to finish publishing. Use this field if you want to have content automatically changed to Unpublished state at a future time (for example, when it is no longer applicable).
- Language. Item language.
- Note. This is normally for the site administrator's use (for example, to document information about this item) and does not show in the Frontend of the site.
Common Tabs
Menu Assignment
- Module Assignment. Select On All Pages, No Pages, Only on the pages selected or On all pages except those selected from the List.
- Menu Selection. If the latter two options are selected a list will show all of the menu items. This allows you to assign modules to some but not all pages, and by selecting the menu links that you want the module associated with you can customize on what pages modules appear/don't appear. See How do you assign a module to specific pages? for more information.
Module Permissions
[[File:Help-4x-module-manager-menu-permissions-screenshot-<translate> en</translate>.png|670px]]
<translate>
- Delete: (Inherited/Allowed/Denied). Allow or deny Delete for users in the Public group. Delete Allows users in the group to delete any content in this extension.</translate>
<translate>
- Edit: (Inherited/Allowed/Denied). Allow or deny Edit for users in the Public group. Edit Allows users in the group to edit any content in this extension.</translate>
<translate>
- Edit State: (Inherited/Allowed/Denied). Allow or deny Edit State for users in the Public group. Edit State Allows users in the group to change the state of any content in this extension.</translate>
Advanced
[[Image:Help-4x-module-manager-advanced-options-screenshot-<translate> en</translate>.png||670px]] {{:Chunk4x:Help screen column header Module Alternative Layout/<translate> en</translate>}} {{:Chunk4x:Help screen column header Module Class Suffix/<translate> en</translate>}} {{:Chunk4x:Help screen column header Caching/<translate> en</translate>}} {{:Chunk4x:Help screen column header Cache Time/<translate> en</translate>}} {{:Chunk4x:Help screen column header Module Style/<translate> en</translate>}} {{:Chunk4x:Help screen column header Module Tag/<translate> en</translate>}} {{:Chunk4x:Help screen column header Bootstrap Size/<translate> en</translate>}} {{:Chunk4x:Help screen column header Header Tag/<translate> en</translate>}} {{:Chunk4x:Help screen column header Header Class/<translate> en</translate>}}
Toolbar
<translate> At the top left you will see the toolbar:</translate>
[[Image:Help-4x-Save-SaveClose-SaveNew-SaveCopy-Close-Help-toolbar-<translate> en</translate>.png]]
<translate> The functions are:</translate> <translate> *Save: Saves the module and stays in the current screen.</translate> <translate> *Save & Close: Saves the module and closes the current screen.</translate> <translate> *Save & New: Saves the module and keeps the editing screen open and ready to create another module.</translate> <translate> *Save as Copy: Saves your changes to a copy of the current module. Does not affect the current module. This toolbar icon is not shown if you are creating a new module.</translate> <translate> *Close: Closes the current screen and returns to the previous screen without saving any modifications you may have made.</translate> <translate> *Help: Opens this help screen.</translate>