Instaliranje Joomle
From Joomla! Documentation
Prvo instaliranje Joomle! je vrlo jednostavno. Joomla! u sebi ima ugrađen web instaler čime se postavljenje vašeg novog sitea znatno olakšava.
Zahtjevi
Hosting zahtjevi
Prije nego što krenemo instalirati Joomlu!, moraju se ispuniti određeni preduvjeti koji omogućuju da se Joomla! 3.x instalira uspješno. Oni vrijede i u slučajevima kad imate poseban server, shared hosting plan server ili instalirate kopiju na lokalno računalo za testiranje ili razvoj.
- Da bi mogli instalirati i koristiti Joomlu, morat ćete ispuniti slijedeće zahtjeve!
Reference
Preporučene PHP.ini postavke
Da bi mogli instalirati Joomlu! moraju se zadovoljite neke određene PHP postavke. To su obično are "php.ini" ili "user.ini". Pitajte vašeg hosta kako promijeniti te postavke, ako je to moguće učiniti. Ako radite na localhostu, tj. s XAMPP-om, ne bi trebali biti ograničeni tim postavkama, kao što ni VPS ili posebna hosting ne bi smio biti toliko restriktivan.
Donje vrijednosti PHP.ini su samo "predložene vrijednosti".
- memory_limit - Minimum: 64M Recommended: 128M or better
- upload_max_filesize - Minimum: 20M
- post_max_size - Minimum: 20M
- max_execution_time: At Least 120 Recommended: 300
Priprema za instalaciju
Prije nego što instalirate Joomlu! na vaš server, morate obaviti svije stvari. Prvo, morate skinuti paket Joomla! datoteka. Drugo, morate imati bazu podataka (database) koju će Joomla! koristiti.
Skidanje i prijenos paketa Joomla! datoteka
Skinite trenutnu verziju
3.x]
- Skinuti instalacijski paket Joomle! prenesite na server. Za transfer Joomla 3.x datoteka na vaš server upotrijebite FTP Client. Postoji više FTP klijenata koje možete koristiti, ovdje je detaljna lista FTP klijenata. Obavezno koristiti službene verzije FTP klijenata.
- Savjet - Najjednostavnije je da skinuti paket prebacite na server i potom ga tamo raspakirate. Ili raspakirajte datoteke na vaše lokalno računalo, potom prebacite instalaciju Joomla na vaš server. U svakom slučaju, instalacija Joomle mora biti raspakirana u root-u vašeg sitea.
"Root" vašeg sitea je javna mapa gdje se spremaju sve datoteke web stranice tako da korisnik može vidjeti site, primjeri uključuju public_html i htdocs. Što vaš Host koristi ovisi o njemu.
Vaše web datoteke obično dižete u root mapu. Ona se obično naziva "public_html" , no može se zvati "htdocs" i to ovisi kako je postavljen vaš server. Što se tiče Joomle!, datoteke možete ukrcati izravno u mapu public_html" ili u sub-mape untar nje.
Ako datoteke najprije raspakirate na vaše računalo pa ih potom kopirate na server, kopirajte isključivo mape i datoteke sadržane UNUTAR Joomla! paketa. Ako mape i datoteke raspakirate u mapu nazvanu, na primjer, Joomla i potom dignete tu mapu, vaš site će biti dostupan na adresi yoursitename.com/Joomla umjesto na adresi yoursitename.com.
Baza podataka (database) za Joomla! instalaciju
- Ako trebate stvoriti bazu podataka (database), najprije pročitajte "Kako stvoriti bazu podataka za korištenje s Joomlom!" ili skočite na korak #2.
- Morat ćete zabilježiti osnovne informacije o bazi podataka koje su potrebne kad krena stvarna instalacija Joomle!.
- Lokacija baze podataka, localhost? ili poseban hostov server kao
dbserver1.vašhost.com? - Ime baze podataka
- ime korisnika baze podataka
- Zaporka korisnika baze podataka
- Lokacija baze podataka, localhost? ili poseban hostov server kao
Pokrenite instalaciju
Glavna konfiguracija
Ako su gornji zahtjevi ispunjeni, stvorena baza podataka i potrebne Joomla! datoteke na svom mjestu, možete krenuti s instalacijom Joomle!. Pokrenite Joomla! web instaler tako da u svo omiljenom pretraživaču pronađete ime domene vašeg sitea. Ako instalirate na host server, koristit ćete http://www.yoursitename.com. Ako Joomlu! instalirate lokalno, koristit ćete http://localhost/<putanju do Joomlinih datoteka>, i morali bi vidjeti ekran instalacije.

Joomla! će pokušati automatski otkriti polje Select Language prema jeziku vašeg pretraživača. Ako je potrebno, ovo možete promijeniti.
Ispunite slijedeće podatke.
- Site Name: ime vašeg websitea — to se kasnije u bilo kojem trenutku može promijeniti na stranici Site Global Configuration.
- Description: opišite vaš website. To je global fallback meta opis koji se koristi na svakoj stranici koju će koristiti tražilice. Općenito, optimalno je do najviše 20 do 25 riječi. Opet, i to se može bilo kad promijeniti na stranici Site Global Configuration. Više informacija o metadata, vidi na Global Metadata Settings i Entering search engine meta-data.
- Admin Email Address: email adresa administratora. Upišite važeću email adresu u slučaju da zaboravite vašu zaporku. Na tu email adresu dobit ćete poveznicu za promjenu zaporke administratora.
- Admin Username: Joomla! koristi za korisničko ime koristi zadano "admin" za Super User-a. Možete ostaviti tako kako je, odmah sad promijeniti (što je dobra Security measure) ili promijeniti kasnije u My Profile na sučelju Administration.
- Admin Password: zapamtite da super user ima maksimalnu kontrolu nad siteom (frontend & backend), te stoga pokušajte koristiti snažnu zaporku. Da bi je kasnije promijenili, upotrijebite My Profile na sučelju Administration. Zaporku potvrdite u okviru Confirm Admin Password.
- Site Offline: kliknite Yes ili No. Yes - to znači da će vaš Joomla! site, kad se završi instalacija, prikazivati poruku 'Site is offline'
yoursitename.comNo - znači da je stranica živa kad dođete do njeyoursitename.comOffline status možete bilo kad promijeniti na sučelju Administration u Site Global Configuration
Kad je sve na prvoj stranici završeno, kliknite na botun next i nastavite:
Konfiguracija baze podataka
Postavke konfiguracije
Sad trebate unijeti podatke o bazi podataka koju ćete koristiti za Joomlu!. U "Pripremi za instalaciju" predložili smo vam da taj podatak zapišete. Također možete ponovno pročitati Stvaranje baze podataka za Joomlu!.

For simplification, these intructions are a reference to installing with a MySQLi database. The instructions on the installation page are self explanatory, but here they are again:
- Database Type: MySQLi is the common database used
- Hostname Where is your database located? Common is
localhost, but some hosts use a specific database server such asdbserver1.yourhost.com - Username: the username used to connect to the database
- Password: the password for the database's username
- Database Name: the name of the database
- Table Prefix: one is generated automatically, but you can change it. For example,
jos3_can be used. Just don't forget to put the underscore character (_) at the end of the prefix. - Old Database Process: should the installer backup or delete existing tables during the installation of new tables? Click, Yes or No to select the choice.
All these choices can be edited on the Site Global Configuration page, under Server options after the installation is completed. Note, you will break your installation if you change these settings after installation unless you have a complete copy of the current database being used by the Joomla! installation. Common uses would be to update the username and password of the database or to complete a move of an existing installation to a new host with different parameters.
When all the information has been filled in, click the next button to proceed:
Finalise
Overview
It is now time to finalise the Joomla! installation. The last page of the web browser installation contains all the information about the installation. This includes the options(at the top) for installing sample data and the installation's configurations(at the bottom).
Install Sample Data and Email Configurations
The first options are for automatically installing sample content to the website and emailing the configuration settings.

Ako prvi put radite s Joomlom! bilo bi dobro da instalirate neke "primjere" kako bi vidjeli kako Joomla! radi. Sad možete zahtijevati da vam se postavke konfiguracije pošalju e-mailom. Ako izaberete Email Configuration, pojavit će se okvir za slanje zaporke -
Email Password. Ovo je po zadanom isključeno zbog sigurnosti. Ako želite da vam pošalju i zaporku, kliknite Yes.
Vrijeme je za provjeru konfiguracije i okruženja vaše instalacije.
Configuration Check
Checking Your Configurations
If everything is in order, you will see the install at the top of the overview page. If not, this is the place to check and see what may be causing an issue.

The section is broken into 4 groups:
- Main Configuration: all the website specific information, such as the website name, description, admin username, etc.
- Database Configuration: contains the information about the database Joomla! will use.
- Pre-Installation Check: these requirements must all be shown as Yes, otherwise you will not be able to install Joomla! With the exception of the PHP Version, the rest are usually controlled in the php.ini. You may need assistance from your host in correcting these settings or checking to see if it is possible to adjust them.
- Typical PHP settings that might cause the install to fail and may need adjusting include the following with suggested values: (1) memory_limit (64M), (2)max_execution_time (30), (3) post_max_size (30M), (4) upload_max_filesize (30M). For more information, see PHP configuration file file.
- Recommended Settings: these are settings are recommended in your PHP configuration, but will not prevent Joomla! from being installed. You can refer to the above instructions on how they may be changed.
If everything is correct and all checks are passed, you may now click the Install button in the top right corner of the Overview page. This will start the actual installation process.
After you click the Install button, you should see a progress bar with additional information of the installation. Once the installation completes, you should see the success page!
Finishing Up
Success and Finishing Up the Installation
Congratulations! Joomla! 3 is now installed. If you want to start using Joomla! right way without installing extra languages there is one last step to complete the installation. You must delete the Installation Folder. Click on Remove Installation folder and a success message will appear. Now you can navigate to the Administrator log in by clicking Administrator or go right to your site by clicking Site.

Installing Extra Languages

Before you complete your installation by deleting the Installation Folder, click on:
- → Extra steps: Install languages
This will continue the installation of Joomla! by taking you to a new installation page.
Install Languages
A list of language packs is displayed.

Check the language or language packs you wish to install. Remember the following:
- Language packs included in custom distributions will not be listed at this stage as they are already installed.
- A version of the packs proposed will match the Joomla Major version (3.0.x, 3.1.x, etc.). The minor version of the pack may not correspond, e.g. you are installing version 3.3.3 and a 3.3.2 language pack is shown.
- Unmatched language packs in the above example may have untranslated strings.
- The unmatched language packs will be offered as an update when the packs are updated by the registered Translation teams. The available update will be shown in the Control panel as well as in Extensions Manager → Update. This behavior is similar to Extensions Manager → Install Languages.
Click Next and a progress bar will be display while the language pack or packs are downloaded.
Choose Default Language
When the download is complete you can choose the default language for the Site and the Administrator interface.
- Make your choices for default languages.
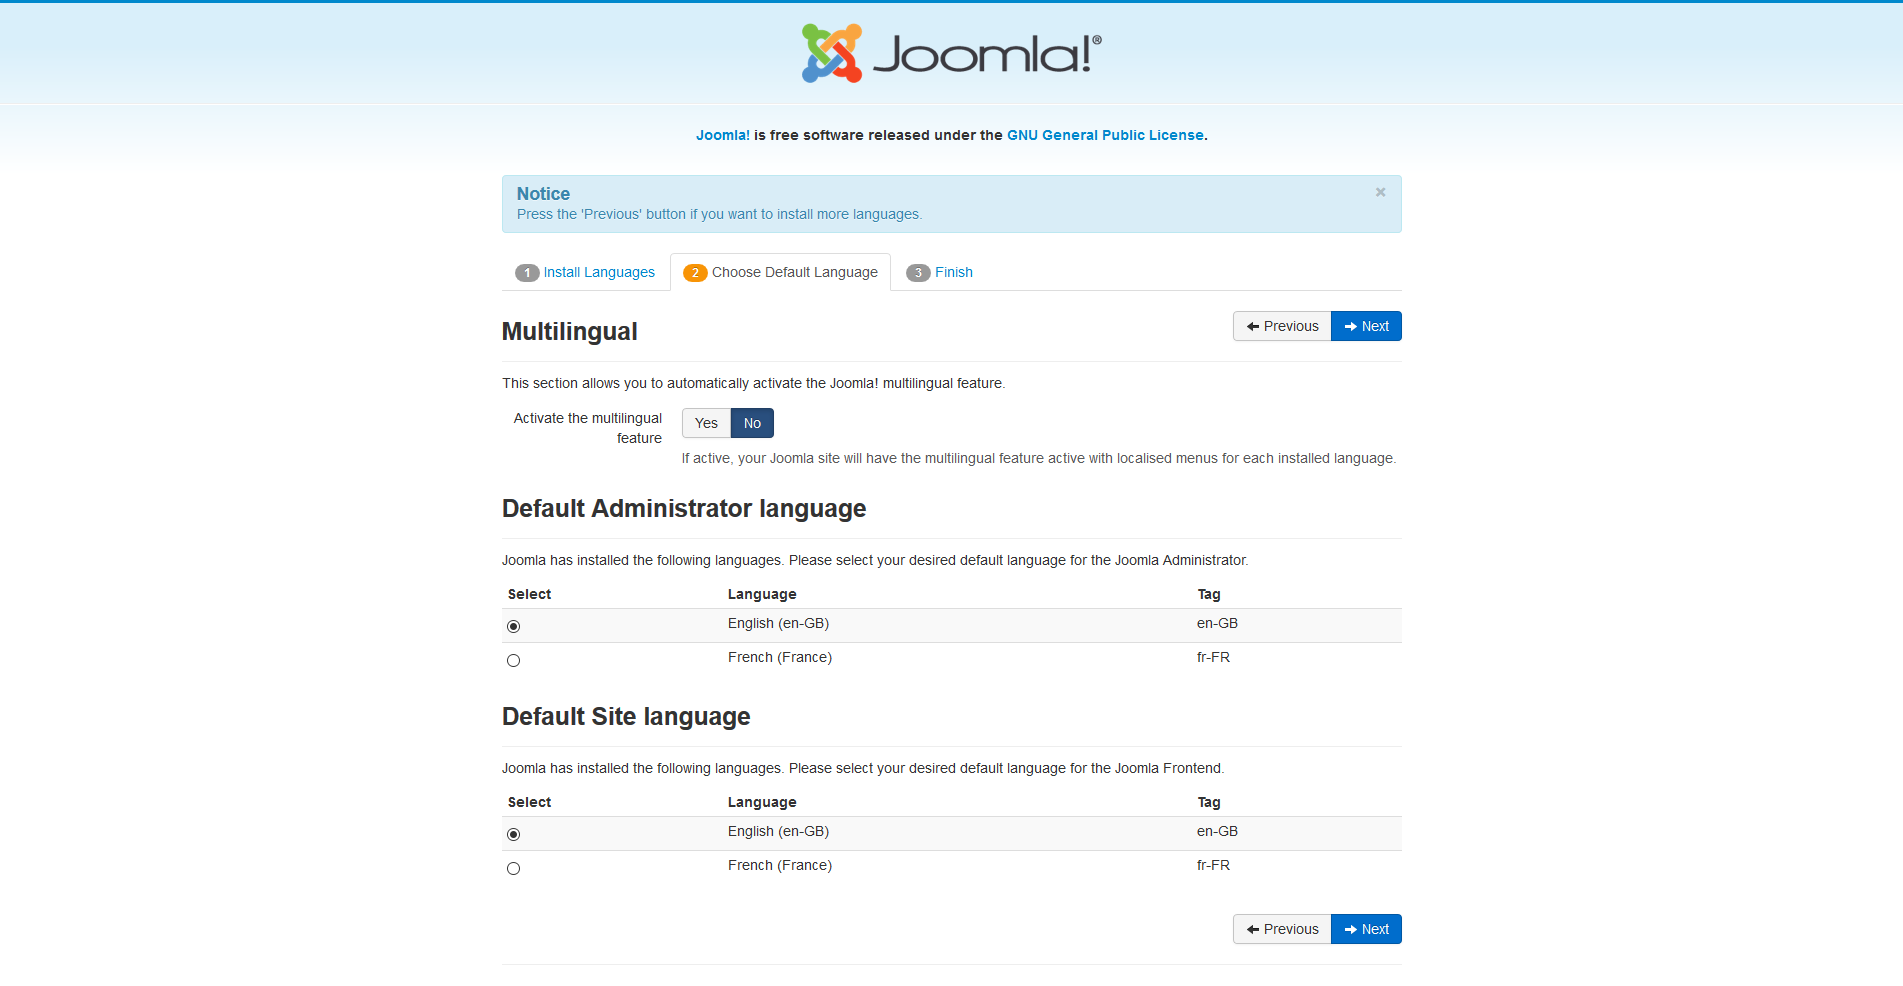

You may also choose to activate the multilingual features of Joomla! at this time too.
- Click Yes next to Activate the multilingual feature
- Two additional choice will appear.
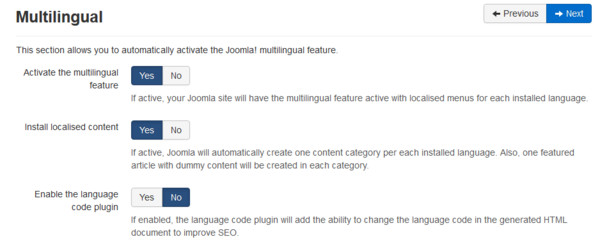
- Install localised content, yes or no. This will automatically create one content category for each language installed and one featured article with dummy content for each content category installed.
- Enable the language code plugin, yes or no. If enabled, the plugin will add the ability to change the language code in the generated HTML document to improve SEO.

When you completed all the choices of language installation, click Next to proceed.
Finalise
You will now be presented with a very similar Congratulations! Joomla! is now installed. screen. The difference will be a notation of the default Administrator and Site language settings, if they were set. You will also not see the Extra Steps message in the bottom right.

Now you can delete the Installation Folder. Click on Remove Installation folder and a success message will appear. Now you can navigate to the Administrator log in by clicking Administrator or go right to your site by clicking Site.