J3.x:Bir çok Dilde Site Ayarlama/Dil Eklentilerini Etkinleştirme
From Joomla! Documentation
How to setup a Multilingual Joomla! Site
Articles in this Series
- Introduction
- Step 1: Installing a new language
- Step 2: Creating a Content Language
- Step 3: Enabling the Language Plugins
- Step 4: Adding Multilingual Content
- Step 5: Creating Menus for the Multilingual Content
- Step 6: Duplicate your Template for each Language
- Step 7: Adding a Language Switcher
- Step 8: Exploring the multilingual site
Joomla! allows you to create easily a multilingual website, without having to install any third party extension. In this tutorial, you’ll find a complete walkthrough of the steps involved in creating a multilingual Joomla! site.
1. Adım - Yeni bir dil yüklemek
Seçenek 1: Varolan bir siteye Çok dilli bir site kurma
Bu yazıda, sitenin varsayılan dili İngilizce'dir. Başka bir dilde konuşan kullanıcılar için aynı içeriğe erişmesine izin veren, ancak farklı bir dilde erişebilen bir dil değiştirme aracı olmalıdır. Burada, Fransızca'yı ikinci site dili olarak kullanacağız - ancak gösteri amaçlıdır. İhtiyacınız olan herhangi bir dili kullanarak aşağıdaki adımları takip edebilirsiniz.
Çok dilli bir web sitesi oluşturmak karmaşık değildir, ancak birtakım önemli adımları izlemeyi gerektirir. Bu nedenle, örnek veri olmadan yeni bir Joomla! 3.x kurulumu ile başlayacağız. Bu şekilde, işleri basit tutabilir ve tam süreç hakkında iyi fikir edinebiliriz. Temel ilkelere hakim olduktan sonra, bunları halihazırda bir dilde içerik bulunan mevcut bir siteye uygulamak daha kolaydır.
Şu anda hangi dillerin mevcut olduğunu kontrol etme
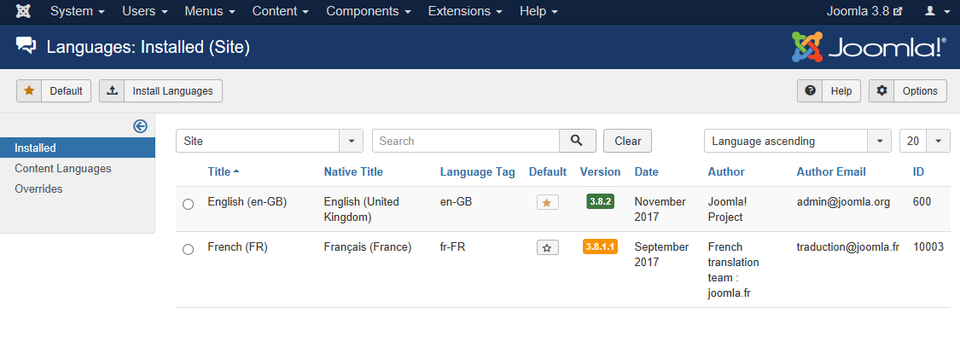
Joomla'yı yükledikten sonra, bir dil kullanılabilir. Bunu Eklentiler → Dil(ler) e giderek kontrol edebilirsiniz. Bu örnekte, şu anda yüklü olan dil İngiliz İngilizcesi'dir (en-GB).
In the side menu, Installed - Site indicates the language Joomla! uses in the frontend (texts such as Read more, Articles and Category). By clicking on Installed - Administrator you can see what language is installed for the backend.
Adding a new language
First, let’s add the language files for the language we want to use as the second language on our site. This involves two steps:
- installing the French language package
- telling Joomla! we want to use it as a content language.
Installing a new language package
Let's install the French language package.
- Go to Extensions → Language(s)
- Click the button at the top left Install Language.
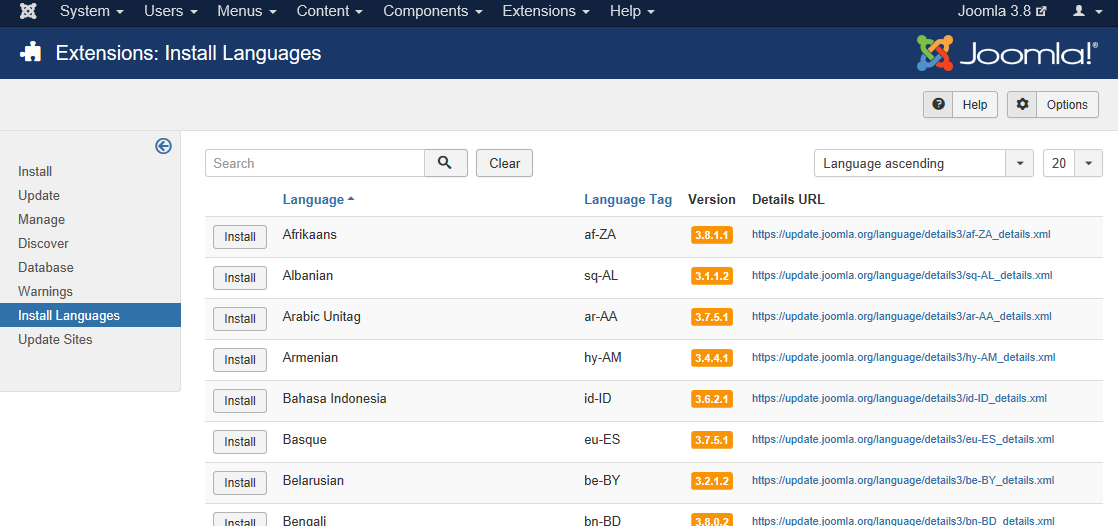
A list of available translations is displayed. You can easily find the desired language by using the Search function. In this field, enter French.
Click the button Install on the left side of the French language. Then, a message is displayed: Installation of the language was successful.. Mission accomplished! In the Languages screen (accessed through Extensions → Language(s)), you can now see that French (fr-FR) language is now available.
Option 2: Setup a multilingual site during a new installation
Install Languages
Before you complete your installation by deleting the Installation Folder, click on → Extra steps: Install languages package.
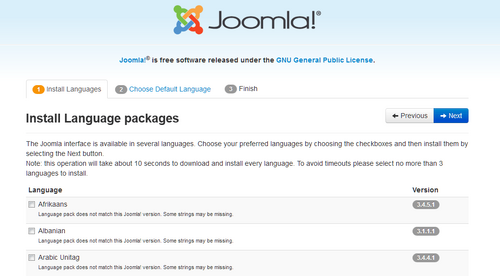
This will continue the installation of Joomla! by taking you to a new installation page. A list of language packs is now displayed.
Check the language or language packs you wish to install, in our case the French package. Remember the following:
- Language packs included in custom distributions will not be listed at this stage as they are already installed.
- A version of the packs proposed will match the Joomla! Major version (3.0.x, 3.1.x, etc.). The minor version of the pack may not correspond.
- Unmatched language packs in the above example may have untranslated strings.
- The unmatched language packs will be offered as an update when the packs are updated by the registered Translation teams. The available update will be shown in the Control panel as well as in Extensions Manager → Update. This behavior is similar to Extensions Manager → Install Languages.
- Click Next and a progress bar will be displayed while the language pack/packs are downloaded.
Choose Default Language
When the download is complete you can choose the default language for the Site and the Administrator interface.
- Make your choices for default languages and activate the multilingual features of Joomla.
- Click Yes next to Activate the multilingual feature
- Two additional choice will appear.
- Install localised content, yes or no. This will automatically create one content category for each language installed and one featured article with dummy content for each content category installed.
- Enable the language code plugin, yes or no. If enabled, the plugin will add the ability to change the language code in the generated HTML document to improve SEO.
- Two additional choice will appear.
When you completed all the choices of language installation, click Next to proceed.
Finalise
You will now be presented with a very similar Congratulations! Joomla! is now installed. screen. The difference will be a notation of the default Administrator and Site language settings. Now you can click on the button Remove installation folder.


